How Drywall Installation Is Done Correctly
Drywall is one of the most affordable and easiest-to-use construction materials. A well-installed drywall lets furniture, artwork, and other decor shine. Despite this, it takes careful attention to work correctly, especially when hanging the panels. Rent a drywall lift or get a friend to help if you work alone. To make this material (wallboard or Sheetrock) look its best, follow Drywall Repair Las Vegas tips.
 Drywall is the backbone of walls and ceilings in most homes, allowing furniture, artwork, and fixtures to shine. However, a poorly installed or damaged wall or ceiling can detract from the look of any room. That’s why drywall installation is one of the most common construction services. Homeowners, property managers, and real estate agents know that a professional drywall job can add value to any home.
Measuring for drywall is pretty straightforward. First, determine the total square footage of the area that needs to be covered in drywall (width times height). Then divide by the size of the sheets you plan on using for your project: for 4×8 sheets, use the square footage divided by 32; for 4×12 sheets, divide it by 48. The resulting number is how many full sheets of drywall will be needed to cover the entire area.
Note that you will need to account for the square footage of any openings, such as windows, doors, and electrical boxes. Also, consider whether you will be using standard drywall or green board, the latter of which is moisture resistant and ideal for kitchens, bathrooms, basements, and other humid areas.
You will also need to factor in labor setup time and mobilization charges to get the job site ready for drywall installation. And don’t forget to include costs for the removal, relocation, and repair of existing framing, surfacing, HVAC, plumbing, and electrical systems if necessary to bring those systems into compliance with current building codes. Lastly, add on any sales tax and general contractor overhead and markup for organizing and supervising the drywall project. All of these factors are essential for accurately estimating your labor costs and producing an accurate estimate for your client.
Drywall installers often work with large sheets of wallboard, which can be a challenge to maneuver and lift alone. To avoid accidents or injuries, it is best to follow the old construction adage “measure twice, cut once.” In addition, it’s a good idea to work with an assistant and consider renting a drywall lift if possible.
Once you’ve determined the dimensions of your wall or ceiling, you’ll need to cut drywall panels to fit around fixtures and to create openings for windows or doors. Sheets of drywall are typically 4 ft by 8 ft, and they can be purchased in a variety of lengths. Depending on the room, you might need to cut holes for electrical boxes, light fixtures, wiring, and so forth.
When it comes to cutting drywall, you’ll need a utility knife and a drywall square to make your cuts. Use the square to mark a straight line where you need to cut, and then snap the excess board away with your utility knife. For outside corners, cover them with a metal corner bead that is installed to the height of your wall. This is not only an attractive finish, but it will prevent future cracking and sagging.
Once you’ve finished putting up the drywall, you can apply several layers of joint compound to each seam and corner. Then, your wall is ready to paint or to be covered with a textured surface. If you choose to use a textured finish, be sure to add another coat of compound over the top of each screw dimple and the entire wallboard to hide any visible imperfections in the surface. You’ll also want to touch up any areas that aren’t smooth.
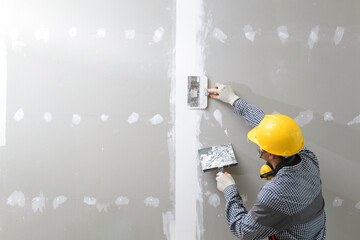
For the best drywall installation, you must first apply several layers of joint compound to seal and smooth the seams. This is called “taping” the wall. It makes a wall stronger, more attractive and easier to paint. It’s critical that the tape be embedded in the mud properly, and it takes some practice to get good at it.
A drywall taping knife (also known as a mud or joint knife) has a long, wide blade that’s typically metal and comes in various lengths. It’s important to use the right size blade for your project, as too small or too large can cause problems. A drywall square can also help ensure your cuts are straight.
When taping, you must make light strokes with the knife. Pressing too hard can flex the blade, making it difficult to smooth the mud over it. The first strokes are made with a thinner coat of mud to give you a base for the rest.
For best results, apply the first coat of mud with a setting-type joint compound rather than all-purpose mud. This type is stronger and better compensates for the elasticity of mesh tape.
Before putting on the second coat, run your knife lightly over the surface to remove any loose bits of paper or loose mud. You’ll want to cover any screw holes, too, since these can weaken the joint over time.
After the third and final coat of mud, you’ll need to sand the walls to create a smooth surface for painting. This is where a hand sander or power sander comes in handy. You can find a wide range of hand and power tools at The Home Depot, including a variety of sanding tools.
Drywall joint compound is known as mud or drywall mud, and it has a consistency similar to frosting. It comes in several varieties, and you can get it in powder form that you mix with water or pre-mixed forms that are ready to use.
The most common variety is called all-purpose. This mud is used for all phases of drywall finishing, from embedding tape to filler and finish coats. It dries quickly and is easy to work with, so it’s the favorite of DIYers.
Another type of drywall compound is quick setting. This mud has a higher level of adhesion for mesh tape and also provides extra strength when applied to large areas. It isn’t as easy to work with and requires careful application techniques, but it dries very fast and can save you time.
There are other types of drywall compound for specific applications, such as lightweight all-purpose and topping compound. Topping compound is very easy to sand and cuts down on finishing time. It’s often used for texture applications and skim coating.
It’s important to note that drywall compound dust can irritate the nose, throat and eyes. It’s a good idea to wear quality protective eyewear, a mask and a respirator when mixing or applying compound, especially in older buildings.
Once you’ve got all the tools and materials prepared, it’s time to start mixing the joint compound. If you’re working with the powder variety, pour it into a bucket and mix it with potable water using a paddle or whisk until it’s a smooth consistency that’s workable. If you’re using pre-mixed compound, skip this step. Using the knife, load the blade about halfway with compound and scrape excess off the edge of the blade and back into the mud box.
If you’re able to get someone to help you move and position the sheets, it makes it much easier. You’ll also find that you will save time when it comes to taping and mudring because the better you work to make sure the sheet is positioned correctly, the less corrections you will have to do later.
To begin hanging the drywall, start at one end of the room and work around it. Keep in mind that you’ll need to be mindful of windows, doorways, and electrical boxes. Whenever you are working on an outside or inside corner, a special technique is required (more on that later).
Begin with the first whole sheet of drywall, positioning it in place, ensuring that both ends fit snugly against the framing components of the wall and ceiling. Secure the drywall with five evenly spaced drywall screws, making sure that each screw is indenting into the paper-backed side of the sheet.
After the first sheet is in place, hang the next one over it. If you’re working with a shorter sheet, be careful not to cut it too short. If you do, it could be difficult to hang the next sheet over it without tearing or pulling out some of the paper on the back of the panel.